Installing NuStair on an Open-Sided Staircase with Adjustable Iron Balusters
NuStair Stair caps are easy-to-install and great-looking. They come with pre-finished stair treads and stair risers, along with one-piece nosing and scotia mold construction that can reduce labor time by 50-70%!
Follow these simple instructions for installing NuStair on your open-sided staircase with adjustable iron balusters:
-
Remove the carpet from the stairs, if you have any.
-
Cut tread ends flush to the outside wall.
The tread is the flat, top part of each step. You will want the tread end to be flush with the wall on the outside of your stairs so that the tread is not sticking out.
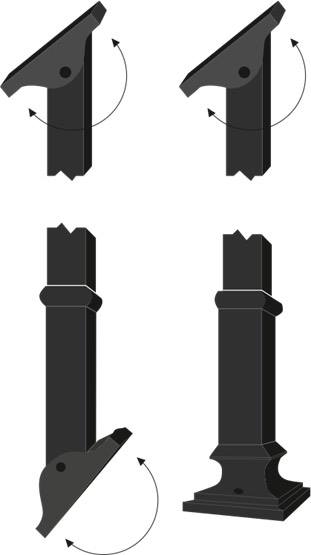
3. Remove existing newel post
Once you’ve cut the tread ends correctly, remove the existing newel post at the bottom of your staircase. This is a structural, vertical post that is used at the top and bottom of a staircase.
4. Apply shims and first riser. Riser should be flush with the existing tread nosing.
Shims are pieces of wood that make sure the old riser and new riser are flush with existing nosing. The nosing is the part of the tread that overlaps the riser on the front part of the step. You want the first riser to come in at a perfect 90 degree angle and there to be no nosing from the first step.
5. Nail along the top of the riser where the next tread will cover. Apply minimal nails along bottom.
6. Apply non-water-based adhesive to the existing tread and install the first NuStair tread.
The first NuStair tread will now hang over the riser (creating a nosing) that you just made flush to the old tread.
7. Nail along back edge so that next riser covers nail holes.
8. Install the new newel post and attach the handrail.
9. You can now remove the current balusters.
10. Install the second riser and NuStair tread.
Again, use shims to make sure the second riser is flush with the old tread, and then install the NuStair tread so it creates a nosing with some overhang.
11. Continue until all treads are installed
12. Install stair brackets to cover gaps between new and old risers.
This will enhance the appearance of your new stairs. No ugly gaps and exposed shims!
13. Install top adjustable shoes.
These should cover any existing holes in your existing railing. The shoes are where your balusters will be inserted.
14. Cut and install balusters with bottom shoes.
Cut the iron balusters to the proper length and install them on the stairs with the bottoms shoes to anchor them.
Easy-to-Install Hardwood Stair Refinishing System
If you’re looking to refinish your worn, ugly stairs, the NuStair system can give you beautiful hardwood stairs at a fraction of the cost, mess, and time of putting in new stairs. Contact us today to be on your way to an easy facelift for your home!